Pietro Rea
Debugging how you think about code signing
December 13, 2020I’ve spent the last 2 weeks researching and writing about code signing and provisioning for my upcoming book “iOS App Distribution & Best Practices”.
During my research there were a number of things I found surprising. This post documents my personal gotchas in the hopes it helps someone. I also offer five specific tips on how you can fix any faulty thinking you might have about these two topics.
You’ll find this post more helpful if you already have some understanding of code signing and provisioning. If you’re starting from scratch, check out the resources at the bottom of the post first.
So why is it hard?
Code signing and provisioning routinely trump even the most experienced developers on Apple’s platforms. There are a few reasons for this: the system behind them is complex and opaque. The frequency of issues is also low. You might run into issues at least once or twice a year when a certificate expires and at most (hopefully) once per release.
On top of high complexity and low frequency, you’re usually under time pressure when issues crop up. Code signing is one of the last things before you submit a build for review. If the release is late, the last thing you want to do is read a programming guide on Apple’s developer site or watch a WWDC video. One common way to fix a code signing issue is to basically try anything and everything until Xcode is happy. It sounds awful but that’s been my personal experience. Unfortunately, I don’t think I’m the only one.
Tip #1: Start with the why
A good place to start debugging how you think about code signing is making sure you have enough background context. Why did this system come about? After reading about the origins of code signing, I stopped seeing a mess of unrelated chores and started thinking in terms of producing something that plugs into Apple’s runtime systems.
You can actually trace back all your code signing woes to something that happened in New Jersey back in the 70’s. All operating systems made by Apple descend from Unix by means of NeXTSTEP and BSD. In Unix (developed at Bell Labs in Murray Hill, NJ) all programs run with the same access and privileges a the user running them. This made sense back then because you probably programmed and loaded all your programs yourself!
“You = your apps” is not a good assumption in modern times. The programs you run today are typically third-party apps. Your third-party apps shouldn’t have the same OS-level access as you in case they are malicious or become compromised.
So what did Apple do about this decades-old assumption? This is where the App Sandbox comes in. Apple made the sandbox part of iOS/watchOS/tvOS from day one and rolled it out to macOS at the same time Apple introduced the Mac App Store.
So if you’re thinking strictly in terms of code signing, you’ve gone two steps too far. Take a step back and think in terms of the App Sandbox and how to interact with it.
So what is the App Sandbox? It’s a system that enforces a strict separation between you and your apps and also separates each app from each other. Apple designed the App Sandbox to limit the damage a bad actor can inflict on your system if they get hold of one of your apps.
As an iOS developer, I’d obviously heard of the sandbox before but I thought the sandbox was just about restricting access to the system-wide file system. This is actually not the case at all. The App Sandbox applies to a lot more: hardware, user files, user data (e.g. calendars, contacts, e-mail) and to all system integrations that could pose a security risk (the ability to send push notifications, integrate with the Health app, etc).
So how does the App Sandbox relate to code signing and provisioning? A sandboxed app that wants to do something restricted must ask for permission from the OS and (sometimes) the user. This permission-based system only makes sense if Apple can unambiguously and securely identify apps, which is what code signing and provisioning are meant to do.
Tip #2: Work backwards
Another problem I had with code signing was losing track of how the different pieces relate to each other. Think of all the terms you have to keep in your head: certificates, entitlements, app IDs, public keys, private keys, provisioning profiles, code signing, and more.
A way to understand the relationships between them is by working backwards from an end goal. Now that you understand the historical need for the App Sandbox, think of your end goal as providing the sandbox with something that can answer its questions about your app at runtime. The end goal is to provide a code-signed provisioning profile, as shown below (full credits to raywenderlich.com for the image).

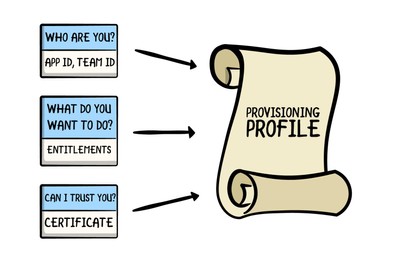
If you only remember one thing from this blog post, remember this image. You can replace whatever mental image you currently have of provisioning profiles with this old-timey scroll. The App sandbox asks questions and the different portions of the provisioing profile answer them (e.g. Who are you? What do you want to access?).
Extra credit: Why does a provisioning profile need to be code signed? A provisioning profile is a plain old .mobileprovision file on your computer. If the provisioning profile weren’t code signed, anyone could change the answers you’re providing to the App Sandbox. Not only would the App Sandbox not be able to trust you, the whole system would not make sense anymore.
Tip #3: Learn to read provisioning profiles
If the end goal is to furnish a code-signed provisioning profile, then you have to know where they live and learn how to read them. As for where they are, Xcode downloads and imports all provisioning profiles into ~/Library/MobileDevice/Provisioning Profiles.
Provisioning profiles are files encoded in the Cryptographic Message Syntax format (CMS) so you can’t just double-click on one to read it. Xcode doesn’t provide a good way to peek inside your provisioning profiles, so what can you do?
You can either use the security command-line tool, like this:
security cms -D -i /path/to/example.mobileprovisionOr you can use Finder’s Quick Look preview. Simply navigate to any .mobileprovision file and hit the space bar. You’ll see a graphical representation of your provisioning profile with all relevant sections:

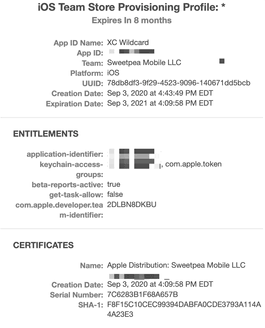
The components to watch out for are the App ID, the list of entitlements and the certificate. Ad-hoc provisioning profiles also include a list of device IDs representing the devices where the app may be installed.
Tip #4: Understand what invalidates provisioning profiles
Troubleshooting invalid provisioning profiles is a common task for someone dealing with code signing issues. Now that you’re a pro at finding and reading provisioning profiles, make sure you understand the common scenarios that can invalidate them. The old-timey scroll from Tip #2 will help here.
A provisioning profile contains different components. Changes to a component will typically invalidate the whole thing. Some examples:
- Any change to the list of entitlements. For example, adding a new capability in the developer portal or in Xcode invalidates all previous provisioning profiles for that app.
- Anything that invalidates the embedded certificate also invalidates the related provisioning profile. Either you or Apple can revoke a certificate or it can expire naturally after one year.
- Not having the associated private key doesn’t technically invalidate a provisioning profile but you won’t be able to code sign it anymore.
Tip #5: Understand where artifacts originate and how they propagate
One of the primary sources of confusion for me was the fact that provisioning profiles are everywhere. You see them on the developer portal, inside a hidden folder on your Mac, in Xcode and embedded in the app’s binary. This is disconcerting for a beginner. Is it all the same document? Where does it originate? Where does it go first and where does it go next? It’s a similar story for certificates and entitlements.
Along the way, Apple tried to be helpful by adding automatic code signing features to Xcode. Letting Xcode take care of code signing and provisioning is great if your use case is simple. But if you have to roll up your sleeves and manage code signing manually, I’ve found the automatic features to make everything more confusing because now there’s no single source of truth (which used to be the developer portal) and there are more places where you see the same artifacts.
You should aim to be clear about where certificates, entitlements and provisioning profiles originate and how they move through your development environment.
- Certificates originate as certificate signing requests that you give Apple to sign. Xcode can do this on your behalf. The certificate, which contains your public key, goes on an amazing journey as part of the provisioning profile (see below) while the private key lives a secret life in Keychain Access.
- Entitlements get tacked onto an App ID in the developer portal. Xcode can also do this for you from the Capabilities menu. Entitlements also go on an amazing journey as part of the provisioning profile (see below).
Entitlements are especially tricky because there are multiple layers of defaults and overrides. Check out the diagram in this technical note to see how entitlements resolve to values after considering all the different layers.
- Provisioning profiles also originate in the developer portal. Xcode can also generate them when automatic code signing is turned on. Once you get a provisioning profile on your machine, it lives in the aforementioned
~/Library/MobileDevice/Provisioning Profilesfolder on your Mac. At build time, Xcode embeds the provisioning profile in the app’s binary.This means that anyone who downloads your app also gets a copy of your provisioning profile! Finally, the information in the provisioning profile gets copied into the digital signature during code signing.
Some parting thoughts
This post has mostly been a journey into my own mind. The five tips are five things I clarified for myself as I wrote the chapter on code signing and provisioning. If you found this helpful, you should also refer to the resources listed below.
Please note that the programming guides refer to the App Sandbox as it refers to the Mac. Apple understandably writes very little about its “runtime policy system” but you can piece some things together by reading these Mac-specific documents.
